


Entertain Your Children Outside with a Mystery!
I’ve posted before here about The Golden Angle, the mysterious 137.5 degree angle that appears in nature and, and my students’ explorations with finding it outside here and here. Recently, I was showing someone about the Golden Angle and how amazing it was in nature. This prompted me to see if I could find it in other places besides an oak tree leaf and grass. Well guess what?! I did. Taking time for a tiny nature walk collection in my yard yielded some more amazement!
With most leaves, I found that lining one side of my angletron tool up to the stem allowed the other side to hit the first vein in the leaf.
Fig tree leaf immediately below:


Shrub leaves below:

Notice how the branches separate at the 137.5 degree angle below.

Nut grass, as my mom calls it, is below. I’ve notices the regular lawn grass grows this way, too when it goes to seed.

I love intriguing math mysteries, and I hope you enjoy them, too.
Not long after I started plucking leaves out of my yard, I noticed a mathy friend of mine posted something on social media about the number 137. Strangley enough, this number is a really big deal to physicists and called the fine-structure constant! Who knew?!
Make Kids Cheer About Trash!
This was probably one of the best projects we did this year. My students made amazing U.S. landmarks from recycled items. Part of the challenge was to include a circuit that lit up. Students accomplished this with Christmas lights. Even if they didn’t bring their project to completion, all students gained more understanding of the landmark they studied and where it was located on a map. In the current educational world where social studies time is lacking, I am grateful for their learning. See some of their work below.


Two Things We Did to Make Studying the Ocean Fun

We studied the ocean recently and my students really enjoyed some activities I am going to share with you. We estimated and measured out the first ocean layer (600 feet) with a very long tape measure of 100 feet. After each 100 feet we made a mark with chalk so that we could see each distance. I put some children in charge of carrying chalk, yard sticks, and the measuring tape. When we weren’t on a hard surface anymore, we stuck a yardstick upright in the ground to hold our measurement mark. Measuring this ocean layer not only helped children with their understanding of measurement, they were able to relate the expanse of the sunlight layer to the size of their own small bodies.
Secondly, we built ocean layers in a bottle. The children LOVED this! There are many people who post about this activity on different websites. I will tell you how our worked. We made density predictions first. The bottom layer was the trenches. We used corn syrup here and we dyed it with red, green, and blue food coloring to make it brown. The next layer–the abyss–we used Dawn dish soap. This worked out okay since it was already blue. The midnight layer was water that we dyed blue. I’m not crazy about using water for this layer because it blended in with the soap and you couldn’t really distinguish much of a difference. At least the students knew there was another layer even though it blended. Next, the twilight layer was cooking oil. This easily worked, and I didn’t attempt to dye it since I knew the food coloring I had wouldn’t mix with oil. I kind of like that it vividly shows up as a different color though. Finally, we added the sunlight layer. This is a layer of alcohol. Make sure to get 90% isopropyl alcohol so it doesn’t mix. We added one drop of blue food coloring to a tablespoon of alcohol.
The problems and what I liked. The bottom three layers are dark and you really can’t tell the difference in them. I think it is good that we put the layers in there so students knew that there were three bottom layers. Know that it is hard to tell the difference in the bottom layers though.
Next, know that this is messy, and you will be having to wash materials. I had some small plastic cups available so children could mix the food coloring. I also had funnels available. Funnels are useful to minimize messes, and I had the children pour this over a paper plate. I had students work in partners and hold one another’s bottle while the other child held the funnel and poured. This worked well.
Originally, I thought I would have the children make the layers proportional to the size they really are in the ocean, but I realized after making a sample that it would be more reasonable for the activity to make all the layers one fourth of a cup except the top layer which was a tablespoon. I gave the children labels and had them write the name of each layer on them as you can see from the pictures. The whole activity took around 90 minutes after instructions were given. My students are well behaved, and I probably wouldn’t have done this if they hadn’t been. If you want to still do this with students who don’t follow directions well, I suggest only making the top three layers and using smaller containers. Happy “diving”!


Fun Mars Rover Helicopter Lesson!

We built these little helicopters a few weeks ago. Students were highly engaged. They are little helicopters that mimic the helicopters which will be deployed from the Mars Rover to obtain pictures of the more rocky terrain.
There is so much rich STEM information provided on the NASA website along with this very helpful video to share with students about the helicopters. Check out this free ready made lesson!


Use Snow to Your Advantage: Snow Day Learning!
There’s no day like a snow day…in the South that is! We have had a great time for about a week and a half with a large amount of snow where I live, yet we were teaching virtually. I knew this was a losing battle. I mean if I was a child, I definitely wouldn’t be doing schoolwork when record snowfall is happening outside. I gave the kids these options, and do you know what?! I actually had some children participate!!
Here is what I assigned them:
Snow Experiments and Creativity
Do this OR pick two of the following:
Build a snow creation that no one else will think of (especially not a snowman or woman). Add extra details to make it more interesting. Give it an interesting name. You must use at least 2 snow tools to build your sculpture. I showed them 2 snow sculpture videos in which they used tools.
What tools did you use?
How did you use the tools? What did you build? Send me a picture.
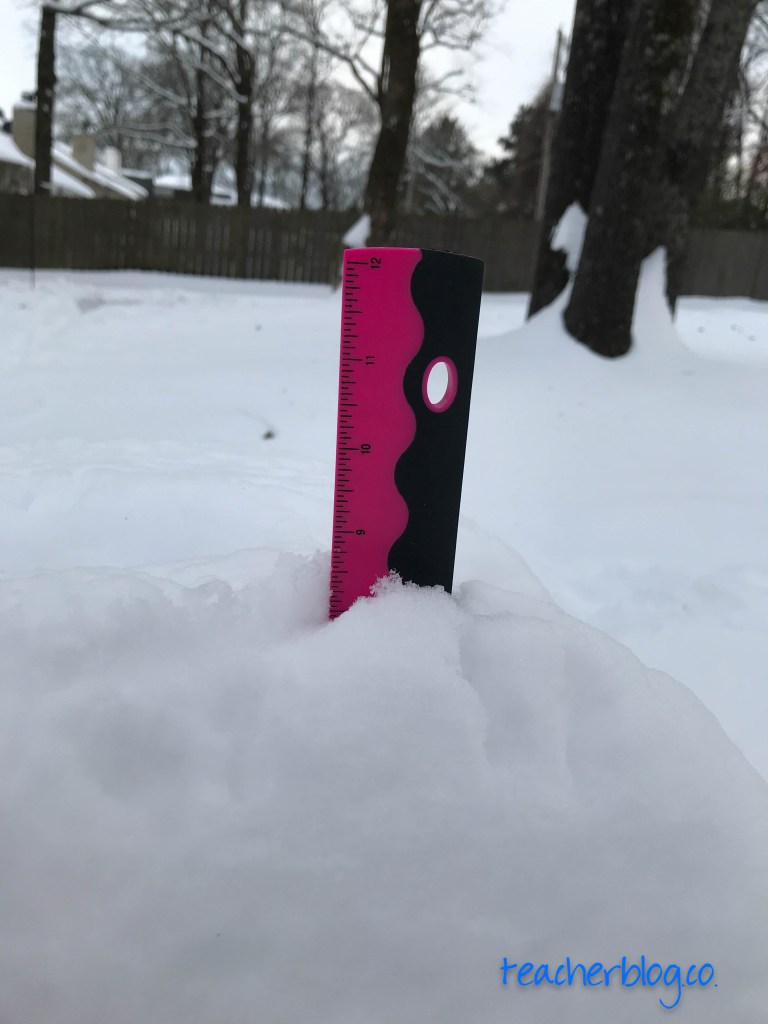
1.Measure the snow in it’s deepest part with a ruler. Use inches. Where did you measure it? How deep was it?

2. Put a some snow in a jar or measuring cup. Mark a line to show how deep it was in the jar. Bring it inside and let it melt. Mark the new line. How did it change? Why do you think this happened?

3. Throw some crackers or breadcrumbs outside. Watch the birds. Feed them. How are they eating since the snow is so deep? What kind of birds do you see? What do you notice?
5. Do you have a thermometer? Take the temperature from your hands outside. Now put on mittens. Put the thermometer inside the mittens. How did the mittens affect the temperature of your hands?
6. Get some containers with a small spout like water bottles and fill them with very cold water. Add food coloring. Make a beautiful picture in the snow by pouring your colored water out on the snow. Send me a picture.
————————————————————————————–
The actual results of my activitiesI had some students measure the snow in a jar and melt the snow in the microwave. Over a zoom we figured out the fractional amount of water that was created after the snow had melted. We discovered that one-fourth of the water remained from the melted snow.
I had students who took their technology device outside to build their snow sculpture so that the other kids could be involved in what they were doing. The sculpture changed several times as it didn’t work out like the child had planned. I also had one child build a snow fort as she turned a tunnel into a structure where her father buried her.
Another student excitedly exclaimed that he had a book about birds for the bird watching activity! (I reminded children they could go inside to do this one and get warm if they got cold in the snow.) This same child seemed to delight in waking his mother up from a nap to ask for food coloring of which they had none.
Lastly, I had a measurement competition going in which children found the depth of snow at their house. Now, I couldn’t tell you if they were being honest, but at least they were pulling out a ruler and thinking about measurement.
I hope you get a chance to experience some of these activities with your students virtually, too!

Wish I Had Known About the Brain!
A couple of years in a row now my partners at other schools have begun the year teaching about the brain and mindsets. I was like, “Yeah, that sounds great.” BUT, I had already planned something else in my mind. They shared their lessons with me and they all revolved around this book…Your Fantastic Elastic Brain by Deak Ph.D., JoAnn and Sarah Ackerley.

Here is a brief sketch of what I did with my students in 1st and 2nd grades this year. These were three 30 minute enrichment lessons. Most of this I cannot take credit for since I didn’t write the lessons, but I adapted them for my own use.
Day 1: I read the first few pages of the book and we learned the parts of the brain here as we touched the parts of the brain on our heads, we talked about each part’s function. We did a coloring sheet in which students colored parts of the brain like are on this page of the book (sorry, but I am not at liberty to share the coloring page).

We also sang with this Story Bots You Tube song.
[embedyt] https://www.youtube.com/watch?v=Nnl7DLSNFV8[/embedyt]Day 2: We read the next few pages of the book and reviewed the parts of the brain. We acted out different scenarios which were pre-prepared (I didn’t come up with them on the spot in other words). Students had to guess which parts of the brain they thought were being used to perform the actions that the children were doing.
Day 3: We read the last few pages of the book, and made neurons with our arms, palms, and fingers. We talked about how electrical impulses travel down the neurons to tell the body what to do. Then I talked to students about how mistakes are the biggest teacher (reiterating what the book says). I brought up the idea of a growth mindset and a fixed mindset. I held a balloon and blew it up. I said this is like a growth mindset. I also held up a flat balloon and said this is a fixed mindset. Then I asked students what they could do to make it easier to blow up the balloon. I wanted them to tell me to stretch it (like their brain). From this point, I found a random fixed mindset/growth mindset poster on the internet and read it while holding the balloon. I had students check phrases they had said before on both the fixed and growth mindset side. This website has a good chart about characteristics of fixed and growth mindset patterns.
What I love when teaching about the brain and fixed/growth mindset is that in essence you are teaching children the power of choices to let their mind expand or stay stagnant. With my older students, I also discussed how when you let your mind go a certain direction over and over it makes a deeper pathway similar to when you walk on the grass a whole lot. I ask the students what helps the grass to stop being dead in the same spot. Students invariably are able to say that you stop walking on it and when the rain comes it grows back up. So it is with anyone’s brain. They stop thinking the worst and the grass grows back up. Their brain stops having that pathway.
I hope you get a chance to teach about the brain and mindsets in your classroom. You won’t regret it!
Make Snowflakes and Learn Math!
What a great way to sneak math into a fun winter activity! Have students figure out how many degrees will have to be in each angle if a hexagon shape is cut into a snowflake. Well. 60 degrees of course because 60×6 angles would make 360 degrees. You can also discuss symmetry after they are cut out to see if the snowflakes truly did turn out symmetrically.
I had students cut these out for a fun enrichment activity. First of all, I read a portion of this book to them since it is about the science behind snowflakes. Did you know snow is NOT MADE by freezing raindrops? Me neither. It is made by frozen water droplets smaller than the tip of your hair. It takes over 100.000 water droplets to make one snowflake. This information and more are included in this unique book which gives the science behind snowflakes.
After I read students a portion of this book, we made snowflakes. I will show you below. The more you do it the better you get!
Step 1: Get a pair of scissors and a sheet of 8.5 x 11 computer printer paper.

Step 2. Fold the paper in half “hamburger style” or the fat way.

Step 3. Fold the paper in half again. Make sure the open corners are facing you. If they are not facing you then your snowflake will be cut in half unintentionally, and you will be left wondering why this happened.

Step 4: Fold the top corner down until it is slightly over the bottom of the rectangle above. I have not changed the orientation of the paper to accomplish this. The open corner are still in the same location as above

Step 5: Finally fold the bottom triangle over the other triangle in a waffle cone type of configuration–(that’s what the kids called it)

Step 6. Slide the end of the “waffle cone” off of the rest of the figure. and you will be left with the bottom of the “waffle cone” which is a triangle.


Step 7. Cut any type of figures you like into the triangle and experiment with different patterns.
 Step 8. Open up your snowflake and see what you have created!
Hang them up in your classroom for a festive winter theme!
Is There Math in Building Robots?
 It seems building robots is frivolous…an extra activity….not really necessary…just for fun, BUT I recently had the privilege to attend a 5- day robotics summer camp, which opened my eyes to the skills involved in learning robotics. Elementary students in grades 2-5 worked with VEX IQ robotics in teams of 2-3.
1.The first day they built the robots from the kit directions.
2.The second day they practiced having the robots drive to certain points on a floor mat.
3.The third day they programmed the robot to go to certain points on the mat.
4.The fourth day they learned to drive the robot with a controller.
5. The fifth day they put all they had learned into practice and competed.
The day they competed was my favorite day because I got too see the students excel with all they had learned.
Here are the major skills I observed kids learning during the process of building robots:
- learning interpersonal skills by working in teams to accomplish a goal
- learning and communicating in angle measures because they had to program their robot to turn
- learning the difference in mm and inches as they had to program their robot to move a certain distance.
- estimating distances as they had to program their robot to stop at a certain point
- exercising perseverance when a part of their robot didn’t quite connect correctly or behave correctly when programmed
Below you will see some photos showing the first mat students used in learning to drive their robots. On this mat students programed their robot to turn and learned about distances. Their task was to program their robot to drive from home (the orange sign) to their friends house (the green sign) to the movie theater (the pink sign). Then they were to program their robot to drive their friend back home and return to home themselves. This task was way more challenging than it appears.


For your students who are unmotivated, what better way to create motivation than to have them do a culminating project of building robots after they learn measurement or as they learn measurement skills.
So I am going to fumble through learning this with my students this year. I will be a novice robotics coach learning along side the kids. 🙂
Crayola Markers STEM Challenge

I made scribble bots with my students during the last days of school. It was a GREAT activity with high engagement and interest among students. Not only that, it is a great way to use your almost dried up markers–the ones that still make a mark, but may not be so good for coloring. All of the other materials are available at the Dollar Tree except for the small motors and items from around the house.
For each scribble bot you will need:
- a small motor (from Amazon)
- a clothespin
- tape (I used masking)
- a AA battery
- a cup (I used styrofoam)
- a popsicle stick
- Old Crayola markers (at least 4)
- old Christmas light wire (we used this instead of alligator clips)
- bulletin board paper large enough for the bot to travel a little way
First, I showed this video to my students.
[embedyt] https://www.youtube.com/watch?v=fUpcV4NnnuE[/embedyt]
Next, I reiterated a few parts of the video such as make sure your motor is perpendicular to the popsicle stick and make sure the motor is all the way on the end of the stick.
This will probably take your students the better part of an hour, but your really smart kids may finish earlier. These students can still be challenged by trying to find a way to make a different pattern with their bot, or using their materials and motor in a different way. Notice the scribble bot with lots of markers all around…my little over achiever made this one. His bot actually made a fabulous pattern! Notice some of the different patterns that are being made on the paper by different students’ bots.


I hope your students enjoy this as much as mine did!


