


10 Ways to Avoid Summer Brain Rot
- Send children outside to collect something. For example, collect, rocks, leaves, flowers, dirt samples. What similarities and differences do you see in each thing?
- Grow something that attracts butterflies such as dill and notice what happens as the caterpillars grow. Do they see any caterpillars shedding their skin as they grow?
- Go outside with a magnifying glass and look at crawling bugs. Where are they going? Are they carrying anything? Why?
- Oldie but a goodie If you have the neighborhood for it, set up a lemonade stand. Have children figure out how much they would have to charge per glass to make money.
- Learn some information above your grade level. Parents can sign their children up for Super Teacher Worksheets and either brush up on topics they need some review with or work to learn skills above their grade level.
- Look at the sky and find cloud pictures. What do chidden see? Do others see something different?
- Draw a picture of your backyard. Now draw a picture of your DREAM backyard. What would you change and why?
- For older children, buy some vinegar and baking soda. Discuss chemical reactions and the Periodic Table. Old film canisters and ziplock bags work great for a closed environment to mix the baking soda and vinegar. The pressure will build and “pop”. the kids will get instant smile with pleasure when the chemical reaction explodes. Protective eyewear would probably be best or just stand at a distance.
- Teach your dog new tricks. Make videos of these to share with your friends.
- My very favorite: Make an angletron like I discussed in the previous post and see how many places you can find the Golden Angle in nature. Here is a printable protractor so you can easily make a Golden Angle measuring tool
Are You Scrambling for End of Year Resources?
I usually am. Well, don’t underestimate Super Teacher Worksheets wealth of resources. Did you know they have cute printable for saying goodby to your students OR super fun puzzles you can do to keep your children busy on those last few days when you are working on cleaning out your room. What about the “brain rot” that happens over the summer. Don’t you think your students’ parents might enjoy a summer fun packet? Look no further! Super Teacher Worksheets has all of this and more!

Try this Great Field Trip!

A few years ago I went on THE best field trip EVER! It is a place your wouldn’t think of going. We went to the water plant. We got to see how water was gathered, filtered, and sanitized. I know not everyone has the same water plant I have, but this is a great trip worth looking into for your area. We got to do a virtual trip this year, which was also great! I’m going to list several reasons why.
- Engineering Process. Even though we didn’t watch any engineers, we got to learn about the filtration process step by step. There is a lot of thought that goes into filtering water and treating the water with different chemicals. It moves throughout several pools to filter before chemicals are added. Very talented engineers had to design this process for it to be safe for us
- Chemistry. Students were able to learn about the chemicals chlorine and fluoride. They learned why these chemicals are important for the water that comes from our faucet.
- Measurement. Our students were able to see how large a pipe was compared to their size. They are about six feet in diameter.
- Appreciation. Students listened to the workers at the plant tell about how they watch computer screens on a 24 hour basis to see if there are any leaks that would indicate there is a problem. These workers have to work even when weather is bad to protect the water supply. This will make you appreciate what comes out of the faucet even more.
- Career opportunities. There are many, many people that work at a water plant providing many career opportunities for children to aspire towards. They can learn first hand from people who hold jobs in a career field they may be interested in.
Students said that this was one of their favorite activities this year–learning about the water plant.
Consider other overlooked places for field trips, also. Have you considered your local electric plant or recycling center? Sometimes learning about the seemingly ordinary and mundane can draw student curiosity.
Make Homemade Paper for Mother’s Day
A while back, I taught an enrichment class about how people in the Far East make paper out of a certain kind of tree bark. This makes really soft paper from which you can make cards. Since Mother’s Day is soon approaching, what a fun activity to teach children! Children can make homemade paper cards for their mothers! I guarantee they haven’t done this before. You will need the following:
glass jar
large bowl
spoon
water
white vinegar (apple cider would be okay too)
colander or strainer
old cotton T-shirt or pillowcase
scissors
dried flower or seeds (optional)

First, cut up small pieces of paper and place as much as you can in the jar. Then cover the paper pieces with water. (Above is brown and white paper combined so you can see how it comes together.) Add a spoonful of vinegar to keep the mixture from molding or spoiling. Set the jar aside for about two days. In two days pour the water and paper mixture into a large bowl. After the two days or so, take the jar and it’s contents and put them into a large bowl. Now, put your hands into the bowl and mush up the paper even more. Break the pieces up into as small of pieces as you can. Now pour the goopy mixture out through a colander and drain off all of the water.

Next, dump the goopy mixture out onto the old T-shirt and place it in an area to dry. Flatten out the mixture and shape it how you want it to dry. If you are using optional pressed flowers or seeds, now is the time to place them onto the paper mixture so that they stick. If you are using flowers, you may want to add a little white Elmers glue to them so that they stick.

Let this dry for a few days on the T-shirt. When dry you may cut it to shape the paper. If you chose to place seeds into the card, you can write on it with marker to say “Happy Mother’s Day” or “plant me”.
If you would like a folded card, the paper may be ironed between the cloth T-shirt in a fold.
Happy St. Patrick’s Day
Teach your students the true story of St. Patrick. There’s more to it than just wearing green!

Are you looking for some great St. Patrick’s Day Activities? Look at the MANY activities that Superteacherworksheets.com offers!
Use Snow to Your Advantage: Snow Day Learning!
There’s no day like a snow day…in the South that is! We have had a great time for about a week and a half with a large amount of snow where I live, yet we were teaching virtually. I knew this was a losing battle. I mean if I was a child, I definitely wouldn’t be doing schoolwork when record snowfall is happening outside. I gave the kids these options, and do you know what?! I actually had some children participate!!
Here is what I assigned them:
Snow Experiments and Creativity
Do this OR pick two of the following:
Build a snow creation that no one else will think of (especially not a snowman or woman). Add extra details to make it more interesting. Give it an interesting name. You must use at least 2 snow tools to build your sculpture. I showed them 2 snow sculpture videos in which they used tools.
What tools did you use?
How did you use the tools? What did you build? Send me a picture.
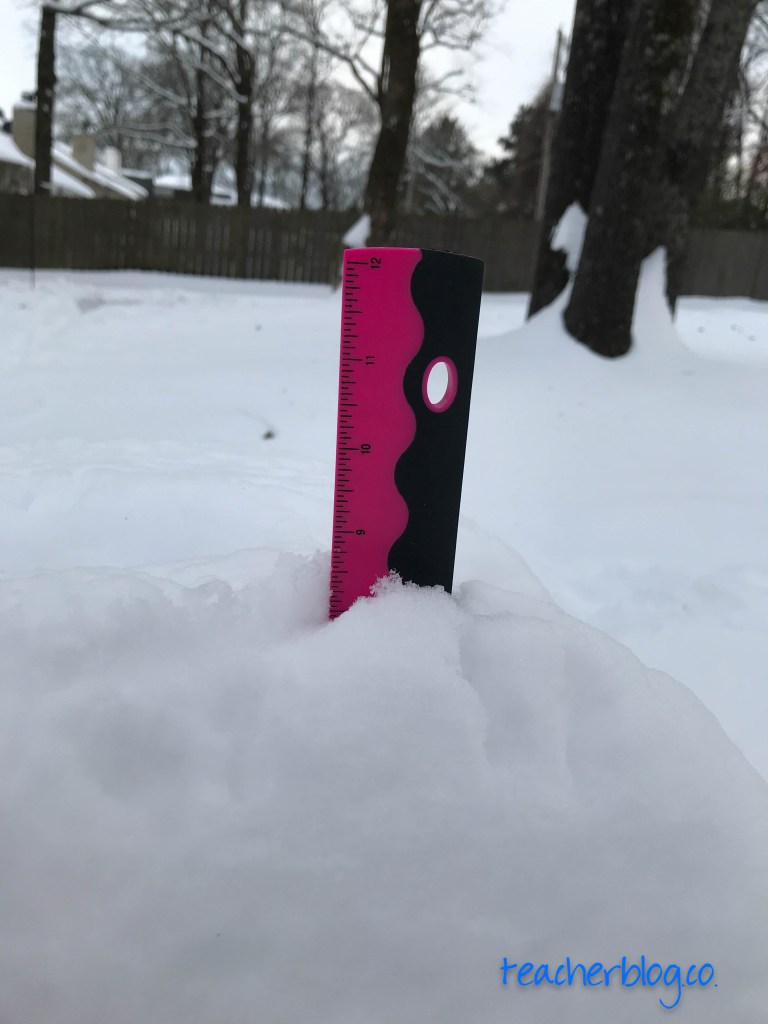
1.Measure the snow in it’s deepest part with a ruler. Use inches. Where did you measure it? How deep was it?

2. Put a some snow in a jar or measuring cup. Mark a line to show how deep it was in the jar. Bring it inside and let it melt. Mark the new line. How did it change? Why do you think this happened?

3. Throw some crackers or breadcrumbs outside. Watch the birds. Feed them. How are they eating since the snow is so deep? What kind of birds do you see? What do you notice?
5. Do you have a thermometer? Take the temperature from your hands outside. Now put on mittens. Put the thermometer inside the mittens. How did the mittens affect the temperature of your hands?
6. Get some containers with a small spout like water bottles and fill them with very cold water. Add food coloring. Make a beautiful picture in the snow by pouring your colored water out on the snow. Send me a picture.
————————————————————————————–
The actual results of my activitiesI had some students measure the snow in a jar and melt the snow in the microwave. Over a zoom we figured out the fractional amount of water that was created after the snow had melted. We discovered that one-fourth of the water remained from the melted snow.
I had students who took their technology device outside to build their snow sculpture so that the other kids could be involved in what they were doing. The sculpture changed several times as it didn’t work out like the child had planned. I also had one child build a snow fort as she turned a tunnel into a structure where her father buried her.
Another student excitedly exclaimed that he had a book about birds for the bird watching activity! (I reminded children they could go inside to do this one and get warm if they got cold in the snow.) This same child seemed to delight in waking his mother up from a nap to ask for food coloring of which they had none.
Lastly, I had a measurement competition going in which children found the depth of snow at their house. Now, I couldn’t tell you if they were being honest, but at least they were pulling out a ruler and thinking about measurement.
I hope you get a chance to experience some of these activities with your students virtually, too!
So Fun Thanksgiving Lesson!
This is probably one of the best lessons I have ever done for Thanksgiving, and it worked so well for including virtual students! I changed the idea a bit from Ian Byrd of birdseed.com where he talks about switching poems around from one holiday to another. Instead of doing this, I decided to have students switch around a Christmas carol to a Thanksgiving carol.

First I asked students to think of a carol for Thanksgiving. Of course I knew they wouldn’t be able to think of one because as far as I know, there are none. I let the students think it was their idea to make Thanksgiving carols. Then I gave students about five well known carols to choose from. I told them to consider syllables and rhyming words. Then I told them to change the words to a Thanksgiving song. I got some really great songs. My favorite part was having them preform their songs on Zoom. “Rudolph the Red-Nosed Reindeer” became “Robert the Blue Beaked Turkey” and I heard “five roast beefs” sung where “five gold rings” would have otherwise been proudly belted out. Then I uploaded the recordings to Class Dojo. I received great comments from parents and teachers!
I hope this gives you a way to add fun and creativity to your next Thanksgiving season!

More Free and Editable AMI—Electricity
So, before the rest of the year became virtual, my students wanted to learn about electricity. I was rather disappointed that we wouldn’t get to learn about electricity, so I decided to give them my best effort at a week with AMI electricity learning. Below are my plans. You are welcome to copy, paste and adapt them for your students.
Learn About Electricity
FUN AND OPTIONAL ACTIVITIES for students
1.Unsafe electric conditions.
Watch this. https://m.youtube.com/watch?v=a52UVl3FoSA
Now, look around your house. Do you see any unsafe electricalconditions in your house? Tell your parents
2. How does electricity get to your house? Watch this.
https://m.youtube.com/watch?v=20Vb6hlLQS
3. Again with your parent’s permission turn on all the lights andmany items that use electricity. Go back and read the meter. Writedown the number. How did it change, and what did you notice?
4. Ask your parents if they can let you see all of the electric bills. Make a bar graph or line graph to show the cost of electricity foreach month for the last year. Which month was most expensive forelectricity? Why do you think so? Discuss this with your parents.
5. Build a lemon battery. This is a rather involved project, but youcan get all the materials at Wal-Mart. You can find alligator clipsand small light bulbs in the automotive section.
https://www.instructables.com/id/Lemon-Batteries-Lighting-an-LED-with-Lemons/
6. Read your electric meter outside. Write down the number, Beforeyou do this, turn off as many lights and appliances as possible. Askyour parents’ permission before you go outside, if you’re not surewhat your electric meter looks like or how to read it watch this.https://m.youtube.com/watch?v=I6UPkncvFhw.
7. Take a picture and post it to Dojo. Did you get the lemon battery to work? Do you think other fruits or vegetables would work? Which ones?
_____
I know number 7 is a little steep to ask of parents, but some students might accomplish this and what a much better idea than playing video games all day!
Quick and Easy Thanksgiving Enrichment Lesson for K and 1st
First, get a small box. I have a small glittery box I bought for a dollar at the Dollar Tree. With the mystery box students have to guess what is inside. They have to ask me 10 questions that have yes or no answers before I will let them guess what is inside the box.
At one school I work at the students are quicker to guess items and so I gave them no hints. At the other school, the students required hints. You will need to do the mystery box activity with them several times before they get the hang of how to ask good questions. Anyways, so I put a feather in the box.
Next, I tell them to imagine they have a pet turkey but that he got very sick and lost all of his feathers. As a result he will be very cold this winter so what will we do to keep him warm?
Then I give students a picture with a turkey that has no feathers. I honestly found some black and white turkey clip art and then printed it. I would share it with ya’ll but I literally cut it with scissors and pasted it on a white sheet of paper and ran copies. I told students to draw a picture of what they would do for their turkey and they did. I also told students I was looking for original ideas about how to keep the turkey warm. I got plenty of non original ideas like feathers, a blanket, a cover etc. The original responses were such things as give him medicine for his feathers to grow, build a fire, put him in the oven, build him a house, and a HOT TUB (which was my favorite).
After this I show them the story of this bird who lost all her feathers. This bird gained lots of fans and people mailed her sweaters from all over the world. Now, I have tried this lesson showing the video before I have the kids come up with their ways to keep their turkey warm and I like showing the video last because it doesn’t influence the students’ originality.
In closing have the students with original ideas show their work.
DONE..SEE…QUICK…EASY!


