


Math Work Stations Experiment Part 1
Last time, I told you all about my experiment with Debbie Diller’s Math Work Stations. Well, it is about 5 weeks into the experiment, and I am loving the idea. Using math stations does however take excellent classroom management skills, but more about that later. The pictures below show a 3rd grade teacher’s classroom. She is an excellent classroom manager and very organized. Once I helped get her station activities together and discussed the details of running the stations, she made the math stations her own. Because we only had a few weeks until the end of the school year, and I was concerned about the students’ fluency with multiplication, we focused most of the math stations around multiplication. Some of the stations are built around multi-digit addition and subtraction to keep this skill fresh in their minds also.
The station tubs are located on a back shelf in the classroom.

There are numbered labels on each tub and little stickers on the shelf below so that students can find the correct place to put the tub when it is returned to the shelf.

The numbers coordinate to a chart which is numbered with the students’ names on it. The teacher put the name on the chart of one of the activities in the tub in addition to the number to make it easier for herself to manage.

I blocked out the students’ names on the cards for their privacy, but on each pink card and on each yellow card there are two names. The pink cards are her first class and the yellow cards are her second class. Our school departmentalized math this year. Students work in pairs in each class. We initially started with only one station and after a few weeks worked up to more than one. In Debbie Diller’s book, she says to start with one for about 20 minutes and do no more than 2 a day totaling about 40 minutes (50 with rotations and cleanup etc.) We placed matching numbers in the room so that students would know exactly where to go when their name was on a particular math station. We also placed these numbers in sequential circular order around the room so that students could easily rotate without running into one another.
In most stations we gave students three choices to pick from which is what Debbie says to do in her book. That way students feel empowered with the fact that they get to make choices. Each of the choices at a station relate to each other. If students don’t want to do one of the games/activities at a station, they have other choices to pick from. Also, if they aren’t as confident with one activity, they can pick a different activity.

In station 1 we placed several addition/ subtraction games which use some of the same materials. The games we included were Close to 100, Close to 0 (basically the same game but subtracting),

and addition/subtraction tic tac toe. Close to 100 and Close to 0 are both games that can be found in the TERC math series. This is out of print, but many buildings have copies of these. Both games use number cards. T
The addition/subtraction tic-tac-toe is teacher made. One student answers the problem. the other student in the pair checks the problem. If the problem is correct, then the first student may place a marker on his problem space. Just like in real tic-tac-toe, the first player to have 3 in a row wins. The three colors of boards are three different levels of problem boards.

I found that both teachers in first and 3rd liked to organize their games in pocket folders.
In station 2 we built the activities around Amanda Bean’s Amazing Dream. This is a fun book with lots of multiplication applications on each page.

In this station students can read the book, work out word problems from the word problem sheet, or create their own word problem stories.

The cake work mat and word problem sheets come from my Discovering the Commutative Property of Multiplication Unit.

Station 3 is a Multiplication Bump game that she got from TPT. Because there are several different game boards, we didn’t provide many options at this station. I have really enforced calling them “Math Work Stations” like Debbie Diller suggests so students remember they are working–NOT playing. I also really like how the teacher took this to heart. Instead of writing I can “play” this or that game, she wrote I can “work” on this game on the I CAN statement sheets.

Station 4, 5, and 6 are duplicates of other stations. Station 7 is a computer station where students are practicing math facts on Reflex Math. Station 8 is also a duplicate. When getting started Debbie Diller says it is fine to duplicate stations so that you aren’t overwhelmed. Because the length of time between when students will be at the same station again is several days, students are okay with a repeated station.
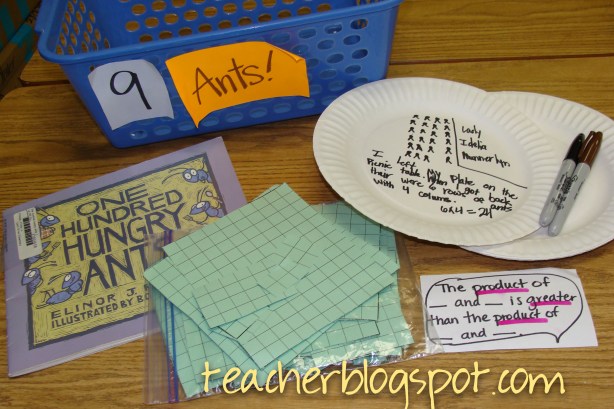
Below is station 9. This station revolves around multiplication as arrays. The 100 Hungry Ants book is about ants in arrays and one of students’ choices is to read the book. Another choice is for students to write their own story problem about arrays with ants on a paper plate…how darling…right? I even suggested that the teacher hang the plates outside her door on a checkered table cloth. (plastic ones are available at the Dollar Tree as I type) Students can also play Array Card Game War, which basically works like regular War but with multiplication facts to go with the Array Cards. This is another TERC math goody in the Things that Come in Groups book.
 I included this speech bubble card which Debbie Diller suggests to help students use math language while they are playing games. We didn’t make them for all of the stations, so I cannot speak to their effectiveness.

Station 10 includes two different publisher made games for multiplication. One is Four in a Row and the other is Hit the Road. These are both games the teacher just had in a file. I am pretty confident you could easily find a game like Four in a Row on the internet because I have come across several games like this before.

At Station 11, students could read the book Each Orange Had 8 Slices. They could solve the problems in the book, or they could write their own problems like the ones in the book.

The above notebook shows an example of some student work that took place while the students were traveling in their math stations. This teacher opted to have each student carry his/her own journal around to each station as opposed to having a community journal at the station. This is a teacher’s personal choice. Students head the page with their math game/activity title, date and math station number.


The classroom teacher also incorporated a missing pieces bucket like Debbie Diller suggests.
And we must mention last but not least BORING STREET. This was a first grade teacher’s idea. This is where you go when you are not behaving at Math Work Stations. This is a collection of boring math work that you can do while everyone else is playing fun math games. The work must be turned in at the end of math station time. 
Next year, we will know just what to expect for Math Work Stations and we can make them even better since we did this end of the year experiment. Up in the next few days…our Math Work Station experiment in 1st grade!
An Exploration of Math Stations
Maybe I’m a little late to jump on the Math Station band wagon, but when anyone mentioned math stations to me, all I heard was centers. I didn’t feel that math stations were the right thing for our school until I read Debbie Diller’s Math Work Stations book. So began my math workstations journey.

The book completely changed my mind about implementing stations. I LOVE IT!
After reading this book, I decided to experiment with the idea of math stations in a 1st grade and 3rd grade classroom. Right now we are getting them set up–deciding what activities to place in each station, making locations for each station in the room etc. Since it is the end of the year, I knew we could spend time working out kinks with stations so that we could start out full force with math stations next year. I will be writing more about our math stations with photos included coming soon.
I am including a freebie here for now that you may want to use in one of your math stations. This sheet will go with an addition/subtraction station like one of the activities Debbie Diller suggests so that students may mark off the facts they know. Click the blue link to download a copy.
AdditionFactsOrganized By Helping Strategy

If you are using Debbie Diller’s math stations, I would love to hear about your experiences with what worked and what didn’t. Please comment below. 🙂
Use This to Build a Foundation with Decimals
After trudging through decimal teaching the last two years, I decided that students needed a stronger visual to help them see the patterns within decimal numbers…after all when students count to 20 in kindergarten, we have pictures of 1-20 plastered everywhere with visual models for students to see. Because students need to see a longer set of decimal numbers to see patterns, I created this decimal number line (and a few other items). The number line has numbers from 0.001-1 on it counting by thousandths. On numbers where the zeros occur at the end of the decimal number the zeros are printed very lightly to remind students that these do not change the value of the decimal number and can be left off. There are picture and number representations of each decimal and optional word cards that can be added by the teacher with the students through class discussion.

Below are the first few numbers on the number line…


and the last set of numbers on the number line…

the word cards…

To top this all off, you can find the Wall Decimal Number Line on sale for 50% off through Wednesday, April 23rd, 2014. Scoop it up while the sale lasts.
You may also like…
Decimal Pocket Chart Number Cards

or Fill in Decimal Number Charts …
Thank You Sale!
To celebrate over 100 followers in my TPT store, I am having a sale in my store with 20% off everything and my newest product is 50% off its original price. The sale will last through Wednesday April 23rd. Find something fun for spring!


Thank you to Zip-A-Dee Doo-Dah Designs for the pretty polka dot background above :)!
Sooooo Cute Spring Bulletin Boards!
Each year a pair of teachers are assigned a month to do the cafeteria bulletin boards. We were given April. With all the pressure of upcoming testing and the additional stressor of losing time to snow days, I didn’t have much creativity roaming in my brain. This board started out as me just wanting to make a simple spring flower to cover up lots of space fast and then… the board looked empty so I decided I must add a little lady bug. I made the flower petals from bulletin board paper folded over and over before I cut similar to when making a paper fan. This helped me not have to cut out a LOT of different petals separately. Then the flower and lady bug idea kept growing and growing and growing…

We have an upcoming science fair so we decided to tie in a science theme along with the spring theme. We made a larger lady bug with an investigating magnifying glass over the top for the second bulletin board. A hula hoop wrapped in black paper strips was used to make the magnifying glass. Then laminating film was stretched over the magnifying glass to look similar to glass. Rolled up black bulletin board paper was used to create the handle for the magnifying glass.

We have gotten so many compliments on these boards about how they brighten up the room. These are on either side of the stage in our cafeteria. I hope these help spark an idea for your spring bulletin boards too!
Teacher “Happy” Freebie before Teasting
The weeks that precede testing tend to be the most stressful at school for teachers. Because I see the frantic looks everywhere, I thought I would put a little cheer in everyone’s mailbox. I put one little “happy” in each teacher’s mailbox during the middle of the weeks before testing. One of the teachers called them “little happies” so now that is what they are!


In case you want to cheer some teachers nearby…I am providing the documents I used. They are editable so you can change the wording a bit if you want! Just click on the link below the pictures to download the file.
What NOT to Do with Dry Erase Markers!
Ya’ll are going to love this one!! Just when the custodian was fussing about the painters tape on the floor and my door being open…I did a doozy….
Since I have been working with lots of intervention groups, I am trying to teach them concepts in a short amount of time while I have them out of the classroom. Yesterday I thought I would work on some measurement estimation. I gave the students 3 choices to estimate the length of a car. 12 inches, 12 feet, and 12 yards. Since these students don’t have a lot of experience with measurement, I had many students say 12 inches or 12 yards so….
I saw the need to draw on the floor with a dry erase marker of course! I drew a 12 inch line with a ruler, a 12 foot line with 12 rulers, and a 12 yard line with yard sticks so students could see the difference. They were easily able to see that the 12 foot line was the best estimate.
Then it came time to rub the line off the floor and whadaya know…but…you guessed it…the dry erase marker wouldn’t budge off the floor! AAAAAAAAHHHHHHH! Oh, no! Well, after soliciting some help
someone suggested dry erase board cleaner…and it worked! YAY!

Now if I had it to do over, I would still write on the floor because it didn’t take too much elbow grease to rub off–and the floor is like a new giant white board with endless possibilities!
Painter’s Tape Strikes Again…
In all honesty my goal was to really use painter’s tape on the floor to make polygons in the first place, but I took a detour with painters tape on this geometry. I just love the fact that floor tiles are actually a square foot– so with that in mind, I had to stick a little area and perimeter lesson down on the floor.

Where did I stick the shapes?
You guessed it! Near the bathroom of course! After all, what other location in the entire school gets more visibility than the bathroom!


For the triangle and octagon I wrote inch measurements on the diagonal lines to help the students calculate the perimeter without a measurement tool. You can’t see that in the pictures.

I numbered the shapes so that they could be matched to an answer key. I was trying to leave in a hurry so I didn’t quite get finished with the answer key. That will be coming soon.

Now, I did think to ask one of the evening custodians if this would be a problem, but she didn’t think so. Well, the next morning, I got a “hmmmph!” The day custodian immediately let me know that the tape had already come off of the floor a bit and asked me how long it would be there.
I said, “not long,” with a smirk.
He informed me that we had gotten second place for the cleanest school last year and showed me his plaque.
I said, “Well, we’ll be the most mathematical school.”
I’m leaving the tape down for a good 4 weeks ;D.
Do You Need Some More Math Activities for Math Night?
Take a look at these exciting photos of our recent Family Math Night. Originally we had scheduled Family Math Night on the 100th Day of school to build more momentum for the event, but we had to reschedule Math Night due to weather. I’m mainly including activities that we hadn’t done before, and I will include links to former math nights so you can get even MORE ideas!
To start, tables with parent information were set up in the hallway. The more inviting and fun student tables were set up inside the cafeteria.
Since many parents are unfamiliar with ten frames (I had never heard of them until I had started teaching), we had a table informing them of how ten frames work.

Then we had an information table showing the parents of 2nd and 3rd graders addition and subtraction strategies. Parents even had an opportunity to see how base ten blocks were used to do regrouping.


Here is a station explaining to parents how Reflex Math works. We had a laptop set up to show parents Reflex Math from a kid’s perspective.
One teacher put together game packets for parents to play math games with their children at home.

Now it’s time for the fun stuff!
Below you will see beach balls with math facts written all over them using Sharpie permanent markers. When someone catches the ball, the right thumb’s landing spot determines the math fact that must be answered. We had large beach balls for the kids to play with and small ones for them to take home. We ordered the beach balls from Oriental Trading Company.


How many books will it take for YOU to weigh 100 pounds? That is the question that students had to answer when they stopped at this station. Students estimated how many heavy encyclopedias it would take for them to weigh 100 pounds. Having experiences with measurement is the best way for students to make reasonable estimates with measurement.


Uh-oh! Looks like he picked up too many books, but he’s close!
Fractions beckoned to students’ interests under the guise of a messy pudding party. Students had to measure out two cups of milk without using a 1 cup measuring cup. They had to use ½, ⅓, or ¼ measuring cup . Doing so made them repeat these measurements until they had milk equivalent to 2 cups.
What is Math Night without estimation stations?

I have done estimation stations every year we have had Math Night, but I wanted to do a little something different this year.

Instead of just having the estimation jar, ziploc baggies were placed in front of the jars with 10 of the candy item inside. This helped students make more precise estimates. I also had a wild idea about gluing base ten blocks together to see who could come the closest to estimating the total of the blocks in a base ten tower.

How many are in this base ten structure? Can you guess?
(above) I know the tower looks more like the leaning tower of Pisa than anything of mathematical value–it looks like a hot mess–a hot glue gun mess ;). What can I say…I think I should pose like one of Charlie’s Angels with my hot glue gun!
(below) Making 10 groups of 10 was a kid favorite last year and remained a kid favorite this year. Kids took small food items and grouped them on a mat. They got to eat their 10 groups of 10/100 items when they had filled up their mat! Yummy!


(below) Where did Freddy the Frog land on the hundred’s chart? These kids played Toss and Guess, a game with a giant hundreds chart grid and a beanbag–in this case a bean bag frog. The idea for the grid and the Toss and Guess game came from The Learning Carpet. Kids received prizes when they guessed where the frog landed correctly.

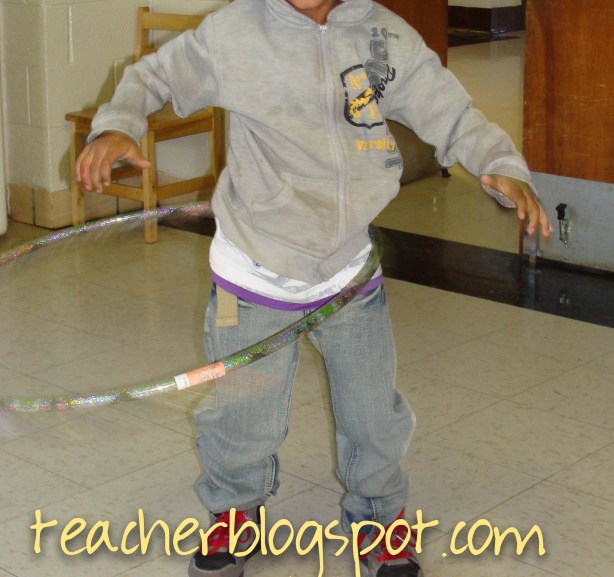
Below is my absolute favorite booth of all booths! How many hulas can you hoop? Students hula hooped until they could hula no more. Then they counted their hulas and wrote the total of their hulas on a piece of paper. They stuck this paper to the wall so other students could compete with the highest total. The two hula hoopers with the greatest number of hulas won a hula hoop!


The following made the evening worth while. This parent solved math problems with her Pre-K student. She helped him count on her fingers! This embodied the goal of the whole evening–helping parents connect to their children through mathematical thinking!

If you liked this post about Math Night, you might also like Math Night from 2012 and 2013…
2012

2013
I hope these posts inspire you to make your math night fun!
Big Sale Thursday and Friday!
This Thursday and Friday, February 27-28th 2014, TPT will be having a huge sale on all their items. We will be celebrating 3 million teacher members! The site will be having 10 percent off all items. All of the items in my store will be 28% off!

Thank you Ashley Hughes and Kimerly Geswein for your amazing graphics! Have a great sale!
www.theschoolsupplyaddict.com
www.kimberlygeswein.com


